OnTime
http://time.ctcces.com. <- site
http://192.168.50.80:4001/timer <- lan
https://docs.getontime.no/ontime/ <- official documentation
- 🚀 Getting Started with OnTime
- 🛠️ OnTime Setup Tutorial for Production Day / Guía para Configurar OnTime para el Día de Producción
🚀 Getting Started with OnTime
🕒 Service Cue Timing & Management System
https://time.elshaddai.app/timer
LAN Access: http://192.168.50.80:4001/timer
📘 Official Docs: docs.getontime.no/ontime
1. 🖱️ Open OnTime & Enter Editor Mode
Abrir OnTime y Entrar en el Modo de Edición

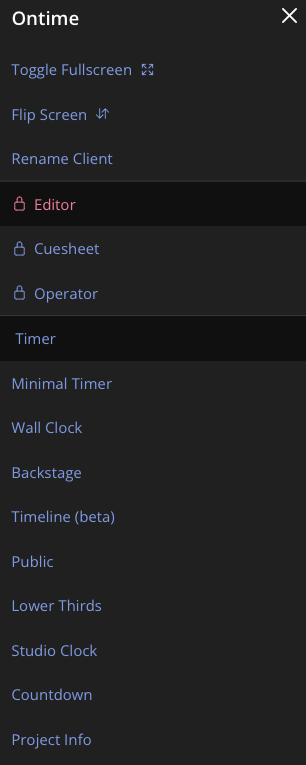
EN:
-
Hover over the top-left corner of the screen.
-
Click the gray square with 3x3 white dots.
-
Select Editor.
-
Enter the PIN code to access the editor.
Don't know the code? Ask Jahaziel, Jessy or Zuriel.
ES:
-
Visita: https://time.elshaddai.app/timer
-
Mueve el mouse a la esquina superior izquierda.
-
Haz clic en el cuadro gris con 3x3 puntos blancos.
-
Selecciona Editor.
-
Ingresa el código PIN para acceder al editor.
¿No sabes el código? Pregunta a Jahaziel, Jessy o Zuriel.
2. ▶️ Start the Timer
Iniciar el Temporizador
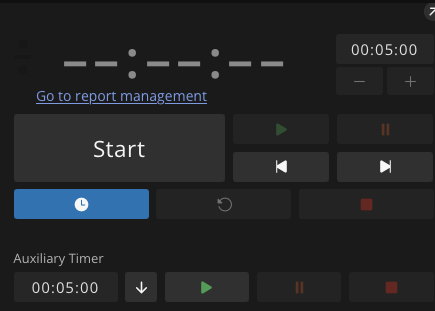
EN:
-
Once inside the Editor, click the gray "Start" button in the top-left.
-
The timer will begin running for the service.
ES:
-
Una vez dentro del Editor, haz clic en el botón gris "Start" en la parte superior izquierda.
-
El temporizador comenzará para el servicio.
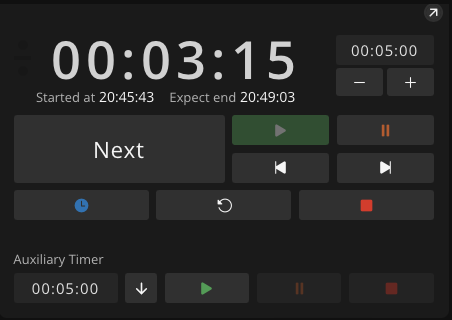
3. ⏱️ Cue Color System
Sistema de Colores del Tiempo
| Color | Meaning (EN) | Significado (ES) |
|---|---|---|
| White | Active / In Progress | Activo / En progreso |
| Orange | Warning – Time ending soon | Advertencia – El tiempo está por acabar |
| Red | Danger – Ending immediately | Peligro – Final inminente |
| Negative | Cue is over time | El tiempo de la sección fue excedido |
4. ⏭️ Moving Between Cues
Moverse entre los Cues
EN:
-
Once a cue ends, click Next.
-
Some cues auto-advance with “End of action: Play next event” — typically for songs/melodies.
-
If it’s empty (""), you must click manually.
ES:
-
Cuando termine un cue, haz clic en Next.
-
Algunos cues avanzan automáticamente con "End of action: Play next event" — típicamente en canciones o melodías.
-
Si está vacío (""), debes hacer clic manualmente.
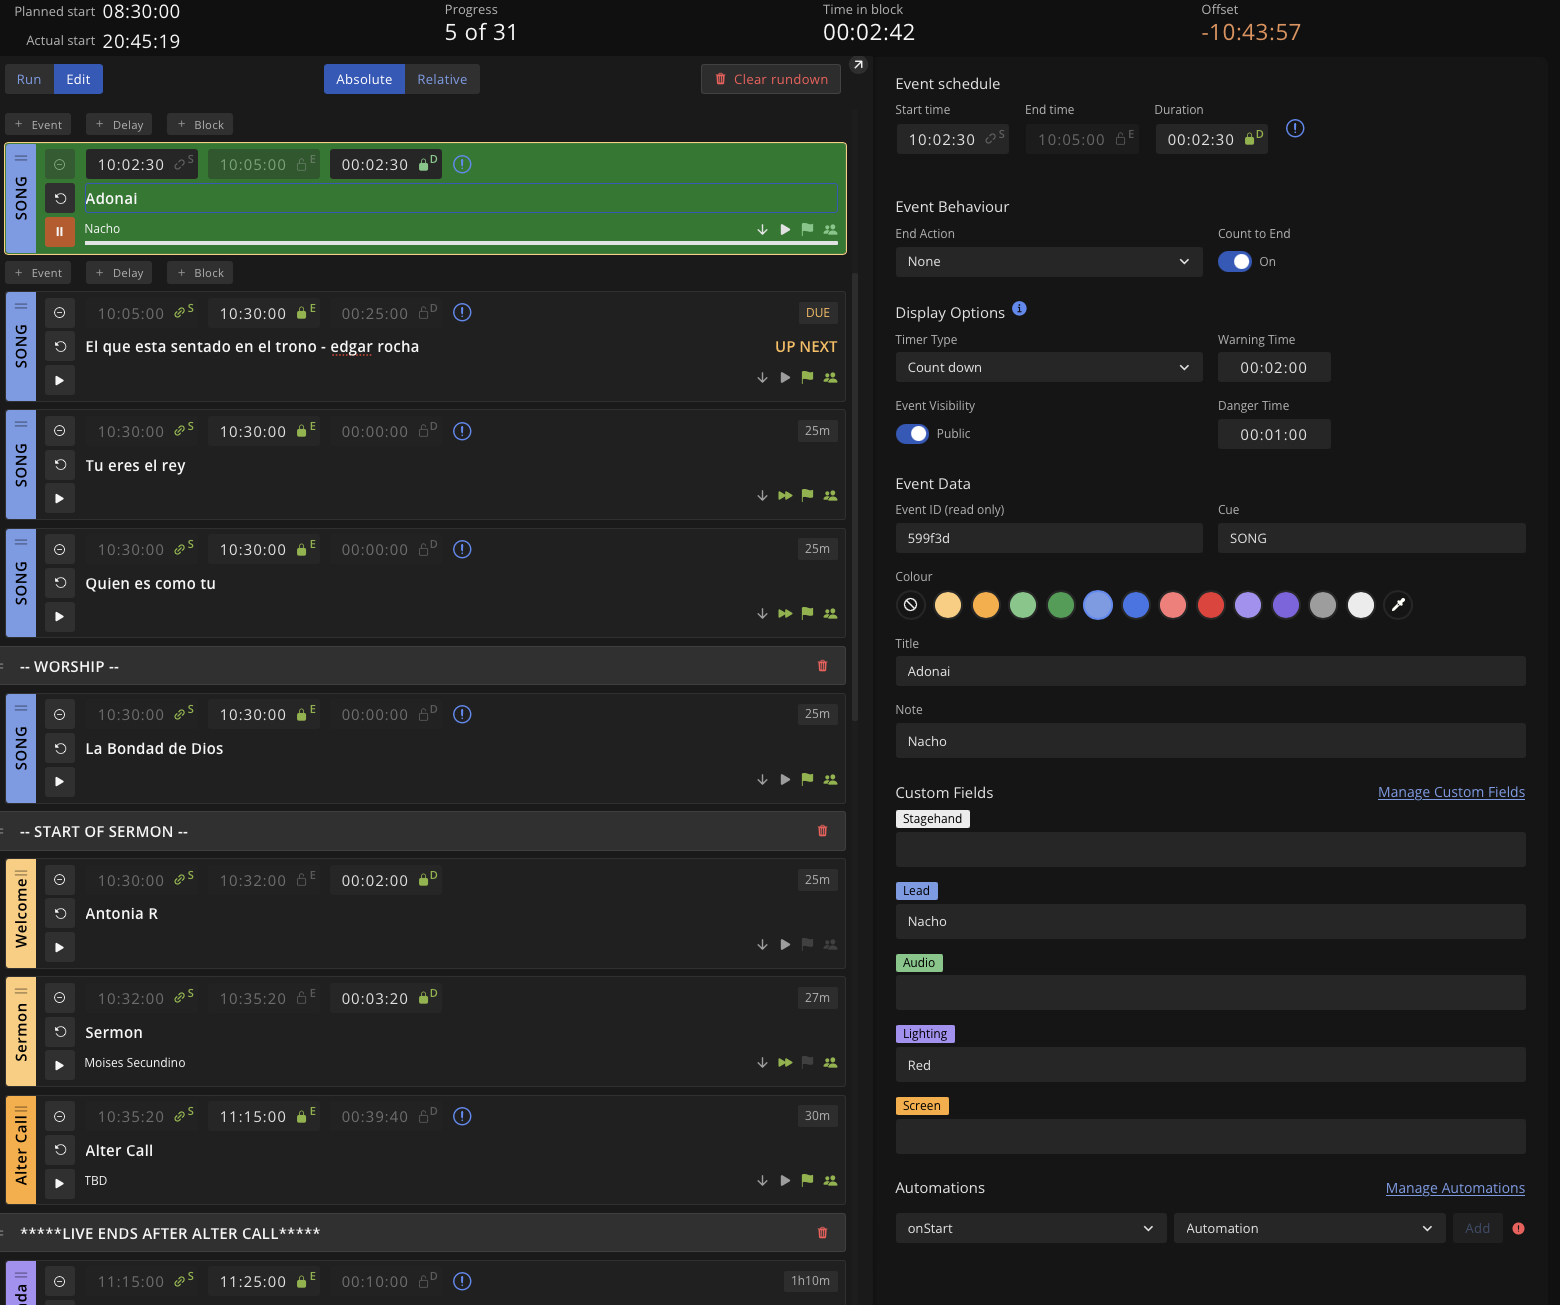
5. 🔍 View Cue Details
Ver Detalles del Cue
EN:
Click any cue to reveal additional info:
-
Speaker
-
Lighting
-
Audio
-
And more…
ES:
Haz clic en cualquier cue para ver más detalles:
-
Orador
-
Luces
-
Audio
-
Y más…
6. 📋 Before You Start
Antes de Comenzar
EN:
-
Double-check that the spreadsheet "RGB Production Team" matches OnTime.
-
Last-minute changes are NOT auto-synced.
-
You can manually edit cues directly in the Editor if needed.
-
See: “Setting up OnTime and editing” for help.
ES:
-
Verifica que la hoja de cálculo "RGB Production Team" coincida con OnTime.
-
Cambios de último minuto NO se sincronizan automáticamente.
-
Puedes editar cues manualmente en el Editor si es necesario.
-
Lee: "Configuración y edición de OnTime" para más ayuda.
📘 Need More Help?
¿Necesitas Más Ayuda?
Visit the official documentation:
https://docs.getontime.no/ontime
📖 Both technical and operational guides available.
🛠️ OnTime Setup Tutorial for Production Day / Guía para Configurar OnTime para el Día de Producción
🔗 Step 1: Get the Service Order from Planning Center
Paso 1: Obtener el Orden del Servicio de Planning Center
EN:
-
Select the correct Sunday service.
-
Copy the order of service.
ES:
-
Selecciona el servicio del domingo correspondiente.
-
Copia el orden del servicio.
📄 Step 2: Input the Order into RGB Production Sheet
Paso 2: Ingresar el Orden en la Hoja de RGB Production
EN:
-
Go to the RGB Production sheet:
👉 RGB Sheet -
Paste the order into the appropriate section.
-
This will automatically sync to the Production OnTime sheet:
👉 OnTime Sheet under the tabSun Service.
ES:
-
Ve a la hoja RGB Production:
👉 RGB Sheet -
Pega el orden en la sección adecuada.
-
Esto se sincronizará automáticamente con la hoja de OnTime:
👉 OnTime Sheet en la pestañaSun Service.
⏱ Step 3: Add Song Durations / End Times
Paso 3: Añadir Duraciones o Tiempos Finales de Canciones
EN:
-
If the “Song” cell is bright red, it’s missing time data.
-
Use the rules below based on service type:
Spanish Service:
English Service:
Duration Time Format:
00:00:00.000=HOUR:MINUTE:SECOND.MILLISECONDS
ES:
-
Si la celda “Song” está en rojo brillante, le falta el tiempo.
-
Usa las siguientes reglas según el servicio:
Servicio en Español:
Servicio en Inglés:
Formato del Tiempo de Duración:
00:00:00.000=HORA:MINUTO:SEGUNDO.MILISEGUNDOS
➕ Step 4: Add Custom Cues If Needed
Paso 4: Añadir Cues Personalizados si es Necesario
EN:
To add a custom cue:
-
Insert a row above/below the desired section.
-
Set the following:
| Field | Value |
|---|---|
| Count to end | true |
| Timer Type | count-down |
| Skip | false |
| End/Duration | (enter time) |
ES:
Para añadir un cue personalizado:
-
Inserta una fila arriba o abajo de la sección deseada.
-
Usa estos valores:
| Campo | Valor |
|---|---|
| Count to end | true |
| Timer Type | count-down |
| Skip | false |
| Tiempo Final | (ingresa tiempo) |
🖥 Step 5: Import to OnTime via Editor
Paso 5: Importar en OnTime desde el Editor
-
Hover top-left corner → Click gray icon with 3x3 dots
-
Select Editor and enter PIN (ask Jessy or Zuriel if needed)
-
Click the gear icon (settings) in the top-left
-
Select “Sync with Google Sheets”
❗ If it says "Sync with Google Sheet" (singular), skip to Step 6 first
EN:
-
Make sure worksheet is
Sun Service -
Scroll to bottom and ensure custom fields (Stagehand, Lead, Audio, Lighting, Screen) exist
-
Click Import Preview
-
If everything looks correct, click Apply
ES:
-
Asegúrate que la hoja sea
Sun Service -
Baja y verifica que los campos personalizados (Stagehand, Lead, Audio, Lighting, Screen) estén presentes
-
Haz clic en Import Preview
-
Si todo está correcto, haz clic en Apply
🔐 Step 6: First-Time Google Sheet Authentication
Paso 6: Autenticación Inicial de Google Sheets
If OnTime says “Sync with Google Sheet”, complete these steps:
EN:
-
Download the credentials file:
👉 Client Secret JSON -
In the Editor, click Choose File and upload
ontime-client_secret_....json -
Set Sheet ID:
-
Click Connect
-
Click the Copy Code button
-
Click Authenticate
-
Paste the code, click Continue, and select your Google account
-
On warning pages, click Advanced > Continue
-
Return to OnTime. If it still shows "Loading", click Authenticate again
ES:
-
Descarga el archivo de credenciales:
👉 Client Secret JSON -
En el Editor, haz clic en Choose File y sube
ontime-client_secret_....json -
Coloca el Sheet ID:
-
Haz clic en Connect
-
Presiona el botón Copy Code
-
Haz clic en Authenticate
-
Pega el código, haz clic en Continuar y selecciona tu cuenta de Google
-
En las páginas de advertencia, haz clic en Avanzado > Continuar
-
Regresa a OnTime. Si dice "Loading", vuelve a hacer clic en Authenticate